
- 분류 전체보기 (112)

| 일 | 월 | 화 | 수 | 목 | 금 | 토 |
|---|---|---|---|---|---|---|
| 1 | ||||||
| 2 | 3 | 4 | 5 | 6 | 7 | 8 |
| 9 | 10 | 11 | 12 | 13 | 14 | 15 |
| 16 | 17 | 18 | 19 | 20 | 21 | 22 |
| 23 | 24 | 25 | 26 | 27 | 28 | 29 |
| 30 | 31 |
- react 기초
- 자바
- Zerobase
- OS
- node.js
- 코드스테이츠
- REACT
- Computer Science
- 비동기
- 파이썬
- 프로그래머스
- 개발공부
- 컴퓨터공학
- java
- Python
- 자바스크립트
- 자료구조
- 운영체제
- context switching
- codestates
- JavaScript
- execution context
- algorithm
- 글또
- 알고리즘
- Operating System
- 테스트코드
- useState
- python algorithm
- 파이썬 알고리즘 인터뷰
- Today
- Total
Back to the Basics
[React] React-Components and Props 본문
이 글은 Reac 공식문서를 통해 공부한 내용을 요약한 포스트입니다.
Components and Props
component는 Javacript의 함수와 비슷하며 다음과 같은 특징을 갖는다.
- props를 입력받고
- screen에 어떻게 표시되는지를 기술하는 React Element를 return 한다.
Function and Class Component
component는 function 또는 class를 통해 정의된다.
- Function Component
function Welcome(props){
  return <h1>Hello, {props.name} </h1>;
}
위의 함수는 props를 입력으로 받고 React Element를 return 하므로 React component이다.
- Class Component
class Welcome extends React.Component{
  render(){
    return <h1>Hello, {this.props.name}</h1>;
  }
}
위와 같이 Class로도 component를 정의할 수 있다. function component와 의미는 React 관점에서 동일하다.
하지만 코드로도 볼 수 있듯이, 함수 컴포넌트로 작성한 것이 더욱 간결하다는 장점이 있다.
또한, class는 legacy한 방법이며, 대부분 새로 작성되는 코드는 function component로 대부분 작성이 된다고 한다.
Props란?
- Props는 property라도고 하며, "외부로부터 전달받은 값"이다.
- 웹어플리케이션에서 component가 가진 속성(attribute)이다.
- 어떤 타입의 값도 넣어 전달할 수 있는 "객체의 형태" 를 갖는다.
- props는 Read-Only이다. compoent는 props를 수정해서는 안되며, 항상 "pure" function 처럼 다루어야 한다.
- 사용자 정의 컴포넌트 (user-defined component)에 JSX attribute와 자식을 component의 단일 객체로 전달하는데, 이것을 props라고 한다.
여기서 사용자 정의 컴포넌트란 div, h 같은 DOM tag와 같은 형태가 아닌, 시용사 정의 컴포넌트를 지정할 수 있다.
const element=<div />;  // React element를 DOM tag로 나타탬

const element=<Welcome name="Sora" />; // 사용자 정의 compoent로 나타냄
- props에 대해 code로 확인해보자.
function Welcome(props){
  return <h1>Hello, {props.name}</h1>;
}

const element=<Welcome name="Sora" />;
ReactDom.render(
  element,
  document.getElementById('root')
);- ReactDom.render() 에서 element를 호출하고있다.
- Welcome은 {name:"Sora"}를 props로 하여 호출된다.
- Welcome component는 <Hello, Sora>를 return gksek.
- React DOM은 이를 3번 결과와 일치하도록 업데이트한다.
참고로, React에서 소문자로 시장하는 태그는 DOM 태그로 처리하며, 컴포넌트는 대문자로 나타낸다.
Props를 수정해서는 안된다는 규칙은 React에 존재하는 한 가지 "엄격한" 규칙이다.
Composing Component
Components는 출력에 다른 component를 참조할 수 있다. React에서는 대부분 Component로 표현되어있다.
function App(){
  return (
    <div>
        <Welcome name="sora"/>
        <Welcome name="rataeng"/>
        <Welcome name="kong"/>
    </div>
    ):
}
Extracting Components
아래의 코드는 comment component로 여러 기능이 구현되어있다.
  function Comment(props) {
  return (
    <div className="Comment">
      <div className="UserInfo">
        <img className="Avatar"
          src={props.author.avatarUrl}
          alt={props.author.name}
        />
        <div className="UserInfo-name">
          {props.author.name}
        </div>
      </div>
      <div className="Comment-text">
        {props.text}
      </div>
      <div className="Comment-date">
        {formatDate(props.date)}
      </div>
    </div>
  );
}
위의 코드를 tree 구조로 형상화해보면, 아래와 같다.
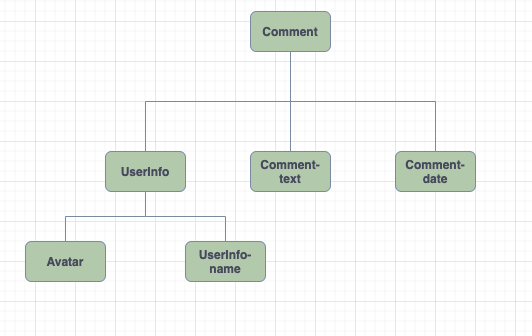
컴포넌트 기반의 개발을 하기 위해선, 어떤 하나의 기능을 담당하는 것을 component로 분리할 필요가 있다.
위의 코드는 props로 author, text, date를 받고 소셜미디어의 comment 창을 구현한다.
위의 코드는 변경하기 매우 까다로우며, 만약 한 부분에서 Error가 발생했을 때 다른 기능들(text or date)까지 사용을 하지 못하게 된다. 또한 개별적인 component가 아니기 때문에 각 기능만 따로 재사용하기가 힘들다.
이 코드들을 몇 개의 component로 분리해보자.
- Avatar
function Avatar(props) {
  return (
    <img className="Avatar"
      src={props.user.avatarUrl}
      alt={props.user.name}
    />
  );
}
이 한수는 Avatar compoent이다
- UserInfo
function UserInfo(props) {
  return (
    <div className="UserInfo">
      <Avatar user={props.user} />
      <div className="UserInfo-name">
        {props.user.name}
      </div>
    </div>
  );
}
이 함수는 Avarar와 UserInfo-name을 자식으로 갖는 UserInfo compoent이다.
- 결과 , 위의 component 적용
function Comment(props) {
  return (
    <div className="Comment">
      <UserInfo user={props.author} />
      <div className="Comment-text">
        {props.text}
      </div>
      <div className="Comment-date">
        {formatDate(props.date)}
      </div>
    </div>
  );
}
맨 처음의 코드와 비교했을 때 확실히 매우 단순해졌다. 코드가 복잡할 때 compoent로 구현하며 구축하면 로 독립적으로 기능을 하며 재사용성 및 유지 보수하기 유리한 코드를 구축할 수 있다.
'Frontend Development > React' 카테고리의 다른 글
| [React][Codestates] React SPA & Router (0) | 2021.08.12 |
|---|---|
| [React] React-State and Lifecycle (0) | 2021.08.11 |
| [React][Codestates] React 기초 II (0) | 2021.08.07 |
| [React] React 기초 I (0) | 2021.08.07 |
| [HTML/CSS][Codestates] HTML CSS 기초 - JavaScript Calculator 코드비교 (0) | 2021.07.06 |


